| Tee | Yardage | Par | H/C |
| Championship | 324 | 4 | 12 |
| Back | 297 | 4 | 12 |
| Middle | 247 | 4 | 12 |
| Forward | 205 | 4 | 12 |
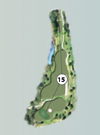
Dominated by a huge mound on the right side of the fairway, this hole demands accuracy and a delicate second shot. Stay left of the mound to have a clear view of the shallow elevated green. Hit a precise short iron and par will ensue. Err short and you�re likely in a bunker. Go long and you�re in the palmettos.
Back to Course Overview
Click-on hole # for individual hole description & photo.
| Hole #1 | Hole #2 | Hole #3 | Hole #4 | Hole #5 | Hole #6 | Hole #7 | Hole #8 | Hole #9 |
| Hole #10 | Hole #11 | Hole #12 | Hole #13 | Hole #14 | Hole #15 | Hole #16 | Hole #17 | Hole #18 |